
We Started Our Vertical Garden!
 |
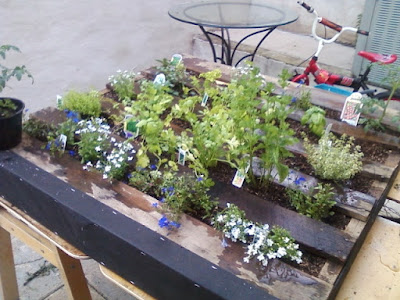
| Planting |
So we have quite a few pallets in our garage because of Park(ing) Day last Sepetmber, and we’ve been thinking about what to do with the rest of them. So far we have had two projects in the house using our wood pallets.
The first project we planned for our wood pallets is our kitchen island. Our most recent project, we had thought about a long time ago and attended a vertical gardening workshop at our local farm—Greensgrow Farms, a fifteen minute walk from our house. We went to said workshop last month to see if there was anything we didn’t know already, they shared a lot of lessons learned and tips and tricks to get the job done. Finally over Memorial Weekend, we started our vertical garden!
Between the vertical gardening workshop and Memorial Weekend we had been discussing what we would like to grow in our vertical garden. I’m not much of a green thumb, but I do enjoy fresh herbs when I cook. Although I get fresh herbs from our Community Supported Agriculture (CSA) Winter and Summer shares at Greensgrow, sometimes I’m just not able to keep them fresh enough, long enough. So I figured why not have my own to harvest from. So we talked about different herbs we tend to use a lot, and kept our options open once we got to Greensgrow Farms. We brought home basil, cilantro, lemon/lime thyme, mint, parsley, tomatoes, and some flowers to add more color to our vertical garden. In a week or two we plan to add garlic to the mix. I am very excited, now all I need to know how to do is make my own mozzarella and chocolate. My life would be complete.

So how to put together your own vertical garden. First you must know that it will take some patience, because as commented by friends “but it’s horizontal,” it is for now and that will change.
You need:
A pallet (if you don’t have a stash like we do, try a big box store, local beer distributor, nursery, farm, dumpster diving…you get the point)
If you want to have herbs or other edible plants in your pallet make sure to find a pallet that is not painted on the side.
2 large bags of potting soil
Soil Moist (little balls that you mix with the soil, and fill up with water that allow your soil to retain water longer and not have to water as much)
Landscape fabric
A staple gun and staples
A hammer
Water
Patience
What to do:
- Double up the landscape fabric and cover the back, sides, and bottom. Line up the fabric on the top, still keeping the top open. The sides, bring the fabric to the edge, and give it a hospital fold. Staple like crazy!
- If the staples aren’t totally in…This is where the hammer comes in. Then reload and continue. Remember this pallet is going to get heavy.
- Lay the pallet down and fill with soil.
- Commence the planting! Think about what you want to plant and make sure they all have similar needs—watering, light, etc. Your planter will stay laid down for a few weeks so the roots can grow , we are planning for 3 and are currently on 1.5 weeks. Water accordingly. Then flip it up and place to your final location. Remember that is heavy and water your pallet thoroughly. If you water from the top the bottom plants may not get as much water.
We are planning to place our vertical garden in front of the house for everyone to see! Now we are just counting down and enjoying the rain watering our pallet. Once it’s in the front of the house we’ll make sure post up a picture.
 |
| 1 week, after watering. |